Dear PLC Technical members,
Hello and welcome to the Blog PLC Technical, this article explains How to Establish an MPI Network Communication between two CPU in SIMATIC Manager Step7. And how to utilize NetPro and Global Data GD Functions to send and get information between CPUs.
I. How to make communication between Two Siemens S7-300 CPUs using MPI cable
Basis example of how to create communication between two Siemens S7-300 PLC's using communication MPI Network. In this example, we demonstrate using these instructions for the communication between SIMATIC S7-300 CPU 313, and SIMATIC S7-300 CPU 314.1. The Purpose of manipulation
The application consists to make communication between two Siemens S7-300 PLCs, using the integrated MPI. Two Siemens S7-300 PLCs connected together with the MPI (Multi-Point Interface) cable. Each Siemens S7-300 series PLC contains an MPI port. For this, we will utilize a Siemens S7-300 PLC.you need to relabel the node address of the two Siemens S7-300 PLCs. For that, you have to use the NetPro Function, and Inserting of the CPU 313, CPU 314 in the Global Data table.
- First: We create a new project and add the SIMATIC S7-300 CPU 313
- Add a second station SIMATIC S7-300 CPU 314
- We then open the Hardware Configuration for the first station and add a rail Rail, power supply, CPU 313, CPU 314, DI, DO.etc.
- We then make MPI settings and must consider that The connection speed in the first control is the same in control Second with different address MPI.
- Save and compile, and the same thing we do with the second SIMATIC S7-300 CPU 314.
- configure Network
- From option MPI we choose to define Global Data
- Then by double-clicking the first column we select First Station SIMATIC S7-300 CPU 313 then by double-tapping the second column We select the second Station SIMATIC S7-300 CPU 314.
1.1 Setting up an MPI network
First, connect your MPI cable to the primary Siemens S7-300 PLC. I will be able to be connecting my laptop to every Siemens S7-300 PLC individually. Then Power up the Siemens S7-300 and open Simatic Manager Step7 software.Presently click the NetPro symbol on the menu bar. A window will open demonstrating the identification of the PLC you are connected to. a window is showing address MPI= 2.
Click Properties and the MPI interface will open. Utilizing the draw down menu, pick your MPI, node address= 3 for Siemens S7-300 CPU 314, and ensure the MPI (1) 187. 5kbps is featured and click OK.
Click Properties and the MPI interface will open. Utilizing the draw down menu, pick your MPI, node address= 3 for Siemens S7-300 CPU 314, and ensure the MPI (1) 187. 5kbps is featured and click OK.
You are presently back on the CPU Properties where you will see your address MPI has changed. Click OK and you will return to the HardWare Configuration where you can check your MPI node address has changed.
Make a note of this address MPI =2 (by default), for SIMATIC S7-300 CPU 313, and address MPI=3 for SIMATIC S7-300 CPU 314.
Make a note of this address MPI =2 (by default), for SIMATIC S7-300 CPU 313, and address MPI=3 for SIMATIC S7-300 CPU 314.
1.2 Global data communication configured in NetPro
Now you see two stations in the project, SIMATIC 300 (1) CPU 313 and SIMATIC 300 (2) CPU314. If you call the access function both you see that all the stations are physically connected to the MPI Network.By global data, for a start let’s open NetPro. Here we will confirm that only the changes are compiled, no error orange background replaced with white.
Go ahead and select the MPI networks, and on the right button of the drop-down menu we, see define global data function.
If you go to Simatic manager, and become on MPI objects and even then in the context menu, we also see the define global data function.
The utility window Global Data opened this table. select column you need to start the first station SIMATIC S7-300 CPU 313. We will do the same for the second Station SIMATIC S7-300 CPU 314.
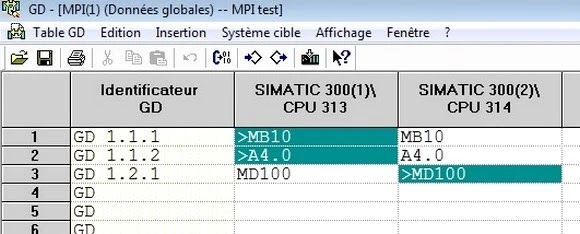
Now you can start assigning Global Data, let’s go to the cell in the first line. Setting the data transfer in byte, word, dword, memory. And the Setting of the Receive data and send data.
- SIMATIC S7-300 CPU 313: Send MB10 / A4.0 and Receive MD100
- SIMATIC S7-300 CPU 314: Send MD100 and Receive MB10 / A4.0
In the last step, we are saved, and so we have finished the Global data settings. These can now be used directly in a program.
Regards,
PLC Technical
Please check this link:


very good article with PLC Technical
ReplyDeletePost a Comment